Showing posts with label Melissa Abbott. Show all posts

Friday, February 2, 2018

Swirling Prosperity


Green jasper cabochon and beads,  amethyst, chrysoprase, turquoise, and some glass beads with bees waxed irish linen thread. Florida Long leaf pine needles#merittisland #melissaabbottdesigns took one year for me to make 14”x14” by 3” high with an asymmetrical shape. “Swirling Prosperity”

Basket started winter 2017 in Merritt Island, FL and was worked on sporadically for 1 year. Finished on Feb 1, 2018 at Cocoa Beach, FL


Sunday, April 5, 2015

Nantucket Basket Making Lesson with Martha Lawrence

I found out that Nantucket Basket Maker, Author, and Authority Martha Lawrence is living an hour and half south of me in Florida where I reside in the winter months. She is the author of "Lightship Baskets of Nantucket" http://www.amazon.com/Lightship-Baskets-Nantucket-Schiffer-Collectors/dp/0764308912 one of my all time favorite books on these very special baskets.
I contacted her and she agreed to give me a lesson and we started off with a basic 6 inch Basket. 

Martha is delightful, knowledgable and very charming. I was thrilled to get to work with her and learn some techniques, tips, and tricks.

Putting the rim on the basket was a cinch with Martha's expertise and techniques!

I wove as tightly as I could!

After my 2nd day of weaving!

The very beginnings... Getting those staves lined up and straight!
A collection of Monnie's Baskets. She is an advanced student if Martha's and definitely inspiring! What work!!

Some other molds and projects at Martha's in process!!

These are Martha Lawrence's  set of nesting baskets from her private collection displayed at her studio. 

My finished basket! What a special basket. I loved making it and I promise to keep it always! Thank you Martha!!

Tuesday, January 13, 2015

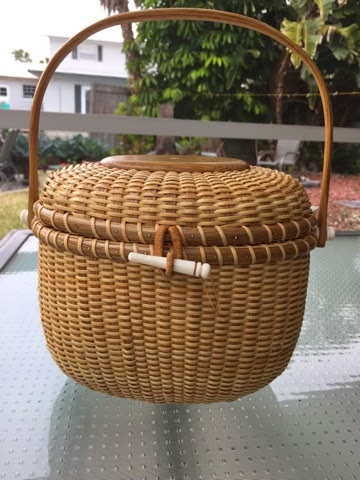
Nantucket Basket Purse with Oak Staves and Base

I finally finished the basket in February 2015 in Merritt Island, FL.

This is 8" Nantucket Basket Purse made with Oak Staves, Bases, and Handle. It is as solid as a rock! I had never attempted a basket purse with hardwood only with cane. I spent months fiddling around with this, and the basket isn't perfect, in so many ways, but it is strong and resilient. I have been joking with people that it will be around much longer than you and I. I am not sure I would do another Oak Purse or not, because there is so little "give", but if I do, I have come up against all the pitfalls of working with this medium in this piece so I am sure my next one would be better. Most challenging basket I have ever made and this includes all my Pine Needle Baskets. I haven't yet decided where I will put a bone scallop shell on the top or do a small scrimshaw. Honestly, the bag has so many errors that I may keep it as an example of " what not to do" for the future and remember how far I have come in my Nantucket Basket Journey!
This winter I am making a 8" Nantucket Basket Purse with Oak Base and Staves. I plan on some really great Scrimshaw for the project too!
This is the very start of the Basket:

getting going!

Almost to the end of weaving the basket base:

More to come as the process develops!!..... Meanwhile I am posting a few pics of some of my Nantucket Basket Molds:

The molds are used to make the shape of the basket. Piece of wood or rattan called Staves are the ribs of the basket. I have placed them into a base ( made of oak) which is slotted. 

The Nantucket Baskets were originally woven on molds made out of old masts and booms off wrecked ships. Oak is the material these particular staves are made from but people use all kinds of woods for bases and staves. 

Many people use Rattan for staves too. I am weaving with Rattan or Cane. 

Traditionally on Nantucket (where I learned this style of basket making from a teacher named Peter Finch) baskets may have been made from other materials other than rattan. Since it is thought that some basket making skills may have been inherited from the Local Wampanoag Indians, they may have even used Pine Needles. There is a bit of a historical connection with the shakers and some early families on the Island and you can see that influence. I have many Molds. I also do a little scrimshaw and use ivory and bone findings (antique of course).


The whalers brought the rattan and cane home to Nantucket in the 1800's from Asia and that's when they started weaving with it. Later many men who were stationed on Light Ships which were ships anchored in shoal water off the island like floating lighthouses they made baskets to sell on the island in the late 1800's. Later the Nantucket purse was popularized in the 1940's by a talented basket maker on the island named Jose Reyes.
There is a wonderful video of Jose Reyes on YouTube:


A Photo f me weaving this basket - Feb 2015
Some of the stages

Gluing the lid

This was a real leap of crazy faith to do this basket without much instruction or a mentor to help me with hardwood baskets. I have some supplies to make a cherry basket purse next with cherry staves and I am hoping I do a better job with that!

Happy Weaving!!
Melissa Smith Abbott

Sunday, November 23, 2014

Pine Needle Basketry is an Opportunity to Live in the Moment


I

Doing Pine Needle Basketry is a really great opportunity to slow down and stay in the moment with your own breath. It is a meditation in itself. When you have yourself settled down this way, you don't project your mental state into the future and instead take great care and interest in each stitch. The old saying that a stitch in time saves nine is so true.

 I started work on a Pine Needle Basket today and I think you can see from the very beginnings of this basket that there is a certain relaxed contentment in it.

This is the thing about making Pine Needle Baskets, we learn by our mistakes and what works for us and what doesn't. Being adaptable and creative can be so much more than just doing a stitch and liking how it looks. Everything about the art form from picking the needles up off the ground, washing and drying them, baking them in glycerin or dyeing them has an energy of love which we infuse with every step into the process of each basket. Art is a process and cultivating the resiliency to be in constant awe and creative adaptability goes a long way towards the overall look of any given basket. It is best to just chalk up any set backs as " experience" and move lovingly forward to the next step in the process. Next time you process some needles try something new or wait for a warmer day. Sometimes this is why baskets can take a long time, because we wait for the perfect moment to do things. This doesn't always come easy. I always want to push things through with my mojo but as I grow older I start to see a wonderful rhythm and energy to the ups and downs or trials of making a basket.

I have tasted the hidden honey of the lotus that expands on the ocean of light, and thus, I am blessed. Let this be my parting word. - Rabindranath Tagore


Wednesday, October 15, 2014

Forest Sky Bowl - completed Oct 2014 Gloucester, MA

"Forest Sky Bowl" 


Begun in July 2014 in Mirror Lake N.H. and finished October 2014 in Gloucester, MA using a green turquoise cabashon with malachite, yellow jade, copper beads, carnelian and glass beads with Crawfords Irish Linen thread waxed with beeswax Needles were sourced on Merritt Island, Fl and preserved in a glycerin bath.

The Start

note: copper spacer beads in plastic package

Close up of start on
Dyed Green Turquoise Cabashon - I love the flecks of gold in it!

Close Up of Copper Spacer Beads used

Working at this at Mirror Lake, N.H. and putting on a row of green glass beads 

Friday, February 28, 2014

My Inspiration for Learning Pine Needle Basketry and a Glycerin Bath Recipe to Preserve and Darken the Needles

Pine Needle Basket made by Melissa Abbott
with Glycerin Preserved Needles

MY IMAGINATION IS STIRRED BY GROVES OF PINE TREES, THE LIGHT, THE SMELL, AND THE MAJESTY OF PINES DELIGHTS AND UPLIFTS!

This Pine Needle & Tennerife Mattapoisett Purse created in 1970’s by Helen Gastar became my inspiration to learn Pine Needle Basketry. Helen Gastar's daughter, Geri, was my friend and I visited their home and saw Helen making this basket many years ago. It always stayed with me and I am sure you can see why.
Helen Gastar's Mattapoisett Basket 

I have always loved Pine Trees especially the scent at Christmas Time when Evergreen Trees are brought into the home. There is a certain something, a mysterious wonder the scent conjures up. Several years ago, I went to visit an old friend on Cape Cod. She lives on the edge of a Pine Woods and we walked our dogs amongst the lovely Pine Trees there. We remembered her mother who had made Pine Needle Baskets and she even had inherited a beautiful basket her mother had made and showed it to me. I was mesmorized by it. In fact I had visited her many years before in Mattapoisett, MA when she was making it. The basket was as hard as wood but light as a feather. This is where the intrigue of the Pine Needle Basket started for me and I eventually learned techniques to make my own baskets.

 Depending on where you live, Long Leaf Pine Needles may be growing near your home. This tree is available throughout the southern United States from Virginia to Gulf of Mexico. The botanical name is Pinus Palustris. In other parts of North America there are other versions of a long leaf pine needle. Many people use Tory Pine, Canary Island, and Guatamalan varieties with success. If you are not able to find them locally you can buy them on the internet from basket suppliers, Etsy sellers, and Ebay. When I first made a Pine Needle Basket, I bought a lb. of Tory Needles on Ebay and they worked wonderfully. After my initial trials, I started collecting needles locally and in my travels. 

At first, I just picked up any old pine needle I found on the ground. I would see a copse of trees by a roadside, pull over, and scoop up what I could under the trees. I soon discovered that a lot of these needles had been laying around for a long time, perhaps even years. Not only were they very dirty, they also had mildew, and even bugs. I decided that I only wanted the freshest needles and I started looking in parks and parking lots where the lawn was often mowed under the trees. 
A Bundle of Needles
 picked up individually
off the ground
with discrimination.


I also discovered that needles fell off the trees after wind storms and if had been particularly windy, it was a good time to look for needles. I found a large park with many Long Leaf Pine Trees on the perimeter. I looked for Pine cones on the ground and where there are pine cones, there are usually pine needles. The freshest needles have a nice new look about them. I started looking for these type of needles exclusively and it made a different using this type of discrimination in my selections.
I dry my needles on Newspapers
The Best time to gather needles is in the Fall
You can, though, gather them anytime of year green and allow them to cure outside in the sun for at least two weeks until they turn a golden brown. You can collect boughs and hang them from a line or fence so as not to touch the ground.
The color of the needles can range from a light tan to a deep walnut color.
If you live in the Northern Climates where the pine needles are shorter you can use them with success but you will have to use lots of them.
After you find your Pine Needles, there are a few things you can do to improve and preserve them. You can put them in the sink and pour boiling hot water over them and a squirt of Dawn Dishwashing liquid. This kills any bugs and washes off any dirt of residual grime from the ground or environment.
Wash in Plenty
of Hot Water and Dawn
when you get home
If you want to dye them, you can use RIT Dye at this point too and many interesting colors can be used. 
Another way to preserve them is to give them a Glycerin Bath which renders them very flexible and preserves them well. I know some people add the RITT Dye to the Glycerin Bath too.


Recipe for Glycerin Bake
Ingredients Needed:
1 16 oz. Pure Vegetable Glycerine
2+ cups of water
Roasting Pan 
(Disposable Aluminum Pans work great)
Pour 2 cups glycerin over pine needles then add 2 cups+ of water, enough to cover your bundle of pine needles with liquid. Swish things around by turning the pine needles over a few times with tongs. Place pan in preheated 225 degree oven
Roast pine needles in the oven making sure glycerin and water mixture doesn't deplete, turn and check often, add more water if necessary. Carefully turn needles with tongs after 1 hour and continue in this fashion for 2-3 hours (some people cook them for even longer, it depends on the color you want. Then turn off oven and let sit in oven overnight. After several hours rinse pine needles really well in the sink with plenty of hot freshwater. Do not throw away the glycerin and water mixture as this can be reused many times. The more you use it the darker and richer the color becomes. I just pour the remaining mix in mason jars and refrigerate until next use.
An Aluminum Pan, Tongs, Measuring Cup, Water,
and Glycerin are all you need

Needles Baked in Glycerin and then Washed in Hot water, Drying

Recently Completed Pine Needle Basket by Melissa Abbott without Glycerin Needles

Happy Basket Making,
Melissa Abbott
Merritt Island, FL
February 2014


\

Wednesday, February 26, 2014

Supplies you need to make Pine Needle Baskets!


I gather all my supplies on a tray to make my work are "mobile". The reason I do this is because I often take this work outdoors to do it on the patio. Natural Light is the best for this kind of handwork. If you can't get bright natural light, make sure you have a nice bright lamp in the house at your work table. Let to right clockwise Bundle of Pine Needles, Basket I am working on with plastic straw on the bundle, sorted gemstone beads, flat jewelry pliers, crawfords linen thread, scissors, plastic bucket for refuse, collections of beads in plastic cases, small wallet with all my needles
Look for Pine Trees, underneath, you will find Pine Needles
Pine Needles collected and washed in Hot Water and Dawn, drying on newspapers on the patio. I put the knife across them so if a gust of wind comes up, they don't blow away.

List of Melissa Abbott's Pine Needle Basket Supplies
1. Crawfords Irish Linen 4 ply Thread http://www.royalwoodltd.com
2. Darning Needles
3. Gemstone Beads and large hole Glass Beads
4. Block of Beeswax
5. E-6000 glue
6. Gemstone Cabashons
7. Long Leaf Pine Needles, washed and dried in sun and then dehulled
8. cookie sheets and newspapers to dry the Pine Needles on after washing
9. 1 Quart Glycerin (optional) if you wish to preserve and darken the Pine Nedles by Baking them in Glycerin and Water in the oven at 225 degrees for 3+hours, then rinsing and drying in sun
10. piece of plastic straw to use as a guide. I like the type from MacDonalds but you can use any size you wish. I have experimented with several types and the larger straws are good for a larger basket.
11. Sissors (don't use good ones they are going to get wax on them)
12. Flat Jewelry Pliers
13. Piece of Fabric to wrap your needles in while you work
14. Tray
14. plastic bobbins for wrapping work
Collection of Caboshons Glued to Leather swatches to Use for Pine Needle Basket Starts
left to right: Malachite, Labradorite, Green Turqoise, Amethyst, Jaspar, Lapis Lazuli, Pink and Gold Turquoise,  and Paua Shell
15. Container for refuse or trash. I use a blue plastic pail I bought at the $1 store 
A Typical Looking Tray
 it changes depending on what I am working on


I use Crawford's 4 ply Waxed Irish Linen Thread
Gemstone Beads
Collect Straws at Restaurants and
cut 1+ inch pieces a bundle guides
Adding Beads to a Basket
The Beginning of a Basket